DIY Outdoor Loungers: A Step-By-Step Guide
- Mark Cisek
- Aug 29, 2025
- 5 min read
Updated: May 19

Skill Level: Intermediate
Overview:
Outdoor loungers bring versatile seating for the whole family. They work well for poolside sun, backyard relaxation, or outdoor movie nights. This project takes the concept further with dual sided backrests that create a set of chaise lounge chairs designed to maximize function and adaptability in your space.
Choosing Your Materials:
The right materials determine both the look and the longevity of your lounge chairs. For this build, cedar is recommended because it is naturally weather resistant, lightweight, and easy to work with. A 5/4-inch cedar board is ideal for the frame, seat slats, and backrest components. Standard 4x4 cedar posts provide strength for the legs.
For fasteners, use exterior-grade screws designed for outdoor projects to prevent rust and staining. Exterior wood glue can be added for extra durability. Small hinges and L-brackets will be used for the backrest connections, and threaded bolts allow the backrests to pivot. Copper pipe is used as support bars to lock the backrests into different angles.
These exact materials are not required. Other wood types and hardware can be substituted as long as they are durable in your environment. Selecting a stain is also up to you. A quality outdoor stain helps waterproof the chairs for added protection and allows you to customize the color and overall look to your style.
Materials:
Step 1: Select Dimensions Based on Cushions
Begin by choosing the dimensions of your lounge chairs according to the cushions you plan to use. For this build the cushions measure 70 inches long by 21 inches wide by 3 inches thick, and will be recessed 1/2" into the frame. These measurements establish the framework for the project and will guide all subsequent cuts and assembly.

Step 2: Cut and Assemble the Frame
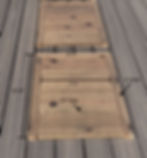
Use 5/4-inch cedar boards to build the main frame, leaving enough clearance for the cushions to fit properly. Cut two boards to 73 inches with 45-degree angles on both ends for the length. Then cut two boards to 23.75 inches with 45-degree ends for the width. Assemble the four pieces into a clean rectangular frame and secure them with 2 1/2" exterior screws (Predrill holes).
Step 3: Install the Center Supports
Mark the exact midpoint of the two long sides of the frame. Using a table saw, rip down 5/4-inch cedar to create two pieces measuring 20 inches long by 1 inch wide by 1 inch high. Position each piece at the midpoint marks, set 1.5 inches down from the top edge of the frame, and secure them with 1 5/8" exterior screws. These will act as the center supports for the bench.

Step 4: Build the Center Bench
Cut three 5/4-inch cedar boards to 21.75 inches in length using a miter saw. Fasten these boards using 1 5/8" screws onto the 1-inch center supports inside the frame, leaving 1.75-inch gaps between each board. This creates the center bench while allowing a 1/2 inch recess from the top of the frame so the cushion sits flush and secure.
Step 5: Add Support Beams
Flip the frame with the bench facing down. Cut three more 5/4-inch cedar boards to 21.75 inches long, then rip them down to 3.5 inches wide. Notch out a 1-inch square on each top end so the boards fit around the center supports. Position each piece directly under the bench boards and screw them in from the sides. These act as additional support beams to strengthen the bench.


Step 6: Add the Legs
From a 4x4x8 post, cut eight legs at 4 inches in height. Position one leg at each corner of the frame and four more along the outer edges of the center support beams. Secure the legs from the sides using 2 1/2" screws, so they sit 3 inches up from the bottom of the frame, creating a uniform 1-inch clearance between the frame and the ground.

Step 7: Install the Support Bars
Measure 12.75 inches from the back of the frame and 1 inch up from the bottom, marking these points on both long sides (four marks total). Drill 0.5-inch holes at each mark. Cut 0.5-inch copper pipe (spray painted) into 22 1/8 inch lengths and slide them into the holes. These bars act as anchor points for the backrest stands to latch onto at different angles. Next add backrest stoppers on each side, spanning across the frame directly on top of the legs, ripped to 1 inch by 21.75". The stoppers should align level with the center bench to keep the backrest even when flat.
Step 8: Build the Backrest Frames
Create the backrests in a picture-frame style. Cut four 5/4-inch cedar boards to 25.25 inches long and rip them down to 2 inches wide. Cut another two boards to 21.5 inches long and rip them to 2 inches wide. On the 25.25-inch boards, cut only the top ends at 45 degrees. On the 21.5-inch boards, cut both ends at 45 degrees. This allows the boards to fit together cleanly in a rectangular picture-frame pattern for each backrest.
Step 9: Install Backrest Slats
Cut eight 5/4-inch cedar boards to 17.5 inches long. Position them inside the backrest frame and fasten from the outside, leaving 0.25-inch gaps between each board. For added durability you can apply exterior wood glue before screwing them in. The gaps prevent water from getting trapped and improve longevity.


Step 10: Build the Backrest Stands
Rip four 5/4-inch cedar boards to 1.5 inches wide and cut them to 11.5 inches long. Round one end of each piece and drill a hole through the center of the rounded side 1" from the top to hold the bolts (these are the sides of your stands for both backrests). Next, rip two more boards to 1.5 inches wide and cut them to 18.5 inches long (two middle pieces for your stands). Attach two of the 11.5" boards to the ends of one longer board (on the non-rounded sides) to form an open rectangle. About 0.5 inches from the square end of each short board, fasten your modified adjustment brackets on both sides.
Step 11: Attach the Backrests to the Stands
On the backside of each backrest, measure 10.25 inches up from the bottom and install two L-brackets, one on each side, just inside the picture frame. Align the backrest stands you built in Step 10 with the brackets and secure them using thin threaded bolts. This allows the backrests to pivot smoothly for dual-sided adjustment.

Step 12: Mount the Backrests
Position each backrest on the center bench and secure it with small hinges. Place one hinge on each side, just inside the outer picture frame, and fasten them to both the bench and the backrest. This hinge connection locks the backrests into place while still allowing them to pivot when adjusted with the stands.
Step 13: Add Lift Strings
Install small eye screws at the top of each backrest. Tie a durable string between the two screws. Because the loungers sit recessed, this string makes it easy to lift the backrests into position when adjusting them.
Final Thoughts:
To complete your chairs, fill the screw holes for a cleaner finished look. Apply an outdoor-rated stain or sealer in the color of your choice to protect the wood. Staining before assembly often makes it easier to reach tight areas. For added flexibility in adjusting the backrests, consider installing the spray-painted copper support bar in a higher position to find the angle that works best for your setup.